-
1. e4, e5
2. Nf3, Nc6
3. Bb5
The Ruy Lopez, also known as the Spanish Opening, named after a Spanish Priest Ruy Lopez who wrote about it in 1561. White puts indirect pressure on blacks e-pawn. This is the first opening I learned, it is still perhaps my favorite opening. I have scored well with it.
3...a6
4. Ba4, Nf6
5. 0-0, Be7
The Closed Defense. The Open Defense with 5...Nxe4 is completely playable. The text is more popular.
6. Re1, b5
7. Bb3, d6
8. c3
Preparing the central advance d4
8...0-0
9. h3
The Main Line of the Modern Ruy Lopez
9...Na5
The Chigorin Defense, still popular at the club level. At least in my old club. Black plans Queenside expansion.
10. Bc2, c5
11. d4, Qc7
12. Nbd2, Nc6
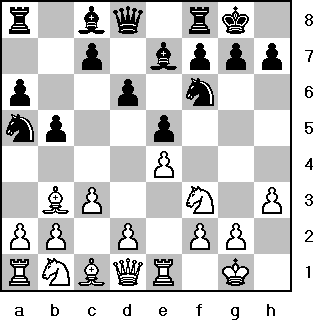
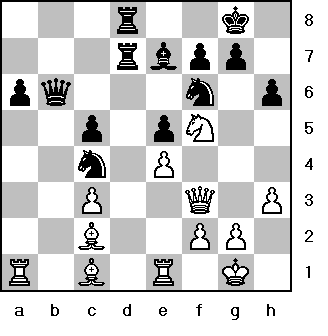
13. dxe5!?
Here my opponent gave an inquisitive look. He was no doubt expecting either 13. d5 closing the center--the most common continuation, or 13. dxc5 the Rauzer variation.
The text is a rarer idea of Bobby Fischer, attempting to make the most of the weakness of the central d5 and f5 squares, which take on special significance in the Ruy Lopez. The text is completely in the spirit of the opening.
13...dxe5
14. Nf1
The Knight Tour Nb1-d2-e3 or g3 is a major part of Ruy Lopez strategy as white.
14...Be6
Completing development while contesting control of d5
15. Nh4
Intending to occupy the f5 square with Nhf5 and Ng3, or to provoke weakness of the blacks kingside to prevent the plan.
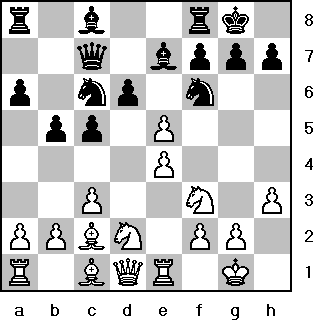
15...Qa5!?
Aggressive. He clears d8 for his rook with the intention of putting a rook on his 2nd (7th)rank and possibly double on the d-file. I took a bit of time here to formulate my plan.
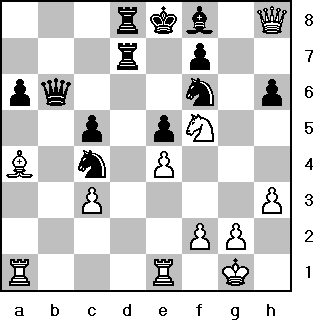
16. Qf3!, Rad8
Obviously not 16...Bxa2?? which is losing after 17. Bd2
17. Bd2, Rd7
18. a4!
A typical Lopez strike which should be studied by all who champion the Ruy Lopez as white.
18...Qd8
Black is ready to give up his rook for two of whites minor pieces, a good trade for him.
19. Bg5, h6
Introducing pawn weaknesses in the formation of the enemy's catled position.
20. Be3, b4
If now 21. cxb4, cxb4 locks up the Queenside.
21. a5!?,
Sacrificing a pawn to keep control of d4.
21...bxc3
22. bxc3, Nax5
Accepting the extra pawn, since compensation is not at all clear.
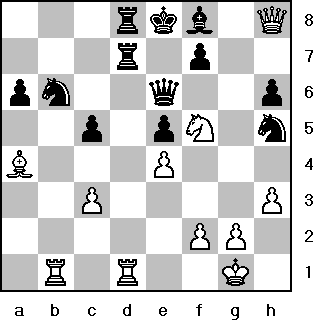
23. Nf5
White has realized the first stage of his plan landing a knight on f5 with strong pressure against blacks kingside especially on h6.
23...Bxf5
24. Qxf5, Qc7
Black defends e5
25. Ng3, Rb8
26. Bc1!
It was imperative to stop the invasion by ...Rb2 yielding black his desired Queenside counterplay.
26...Rbd8
27. Qf3, Qb6
28. Nf5
My other knight now lands on the f5 square.
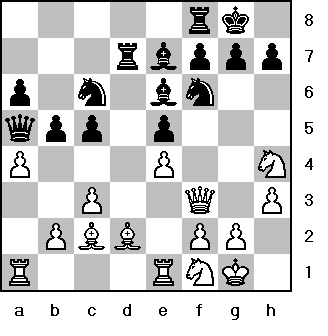
28...Nc4
Blacks position appears to be solid. Given one more move black will achieve counterplay by ...Nd2. The most important thing to notice is that his kingside is under pressure and a target for whites pieces. This is the critical moment. White must strike now!
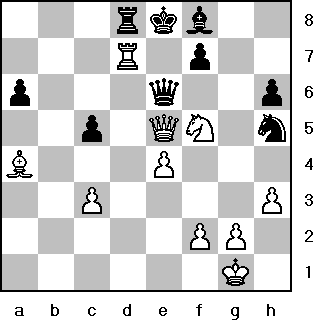
29. Bxh6!!
Smashing through!
29...gxh6
30. Qg3+, Kf8
The Point of the sacrifice on 30...Kh8 or 30...Kh7 comes 31. Qg7#
31. Qg7+, Ke8
32. Qh8+, Bf8
White has invested a piece to slaughter the enemy's positon. I take some time to analyze the best continuation.
33. Ba4!
This pin is quite painful. It reminds me of the Morphy-Allies game with some similar ideas.
33...Nh5
Black vacates the 6th rank so he may bring his Queen to the kingside for defense.
34. Red1
Applying pressure to the pinned piece.
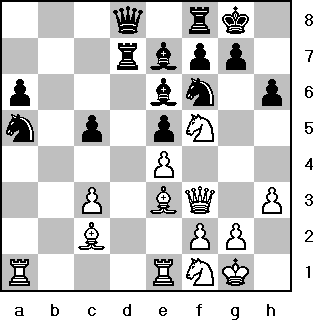
34...Qe6
His original intention of 34...Qf6 runs into 35. Rxd7! and if 35...Qxh8 then 36. Re7# and on 35...Rxd7 36. Bxd7+, Kxd7 37. Qxf8 White is up the exchange and threatens Rd1+.
35. Rab1
Notice it is white who now dominates the open files.
35...Nb6
If 35...Nf6 then 36. Ng7+ wins the black Queen.
The text move (35...Nb6) was played to prevent Rb7 attacking the pinned piece yet again. White has a dominating position and can finish in style.
36. Rxb6!!
Enticing the black Queen from the defense of e5.
36...Qxb6
37. Qxe5+, Qe6
(If 37...Be7 38. Qxe7# due to the pin on the rook on d7)
38. Rxd7!
38...Resigns
After 38...Qxe5 39. Re7++#! or 38...Rxd7 39. Qb8#!
A devastating Ruy Lopez Attack in Classic Style. My Best Game ever!!